Create falling sand simulation
Hey everyone, I've got a super cool project to share with you - a falling sand simulation.
So, I was just chilling, watching some YouTube videos, when I stumbled upon this awesome falling sand coding challenge. I thought, why not bring this magic to our SwiftIO Playground Kit? (The Swift core team is actively developing embedded Swift, and I'd like to introduce you the potential of embedded Swift programming through hands-on projects.)
Here's the plan: I use a button to spray sand and a potentiometer to control where it goes. Turn the knob, press the button, and boom! A beautiful sand scene on my tiny screen. So, I set up the kit next to my computer and dive right in.
TL;DR
Here's a breakdown of the development process in 7 steps:
- Add one sand particle
- Move it
- Add sand sprayer
- Create sand with the sprayer
- Create natural sandpiles
- Add more sand
- Add more colors
Let's go through them step by step.
1. Add one sand particle
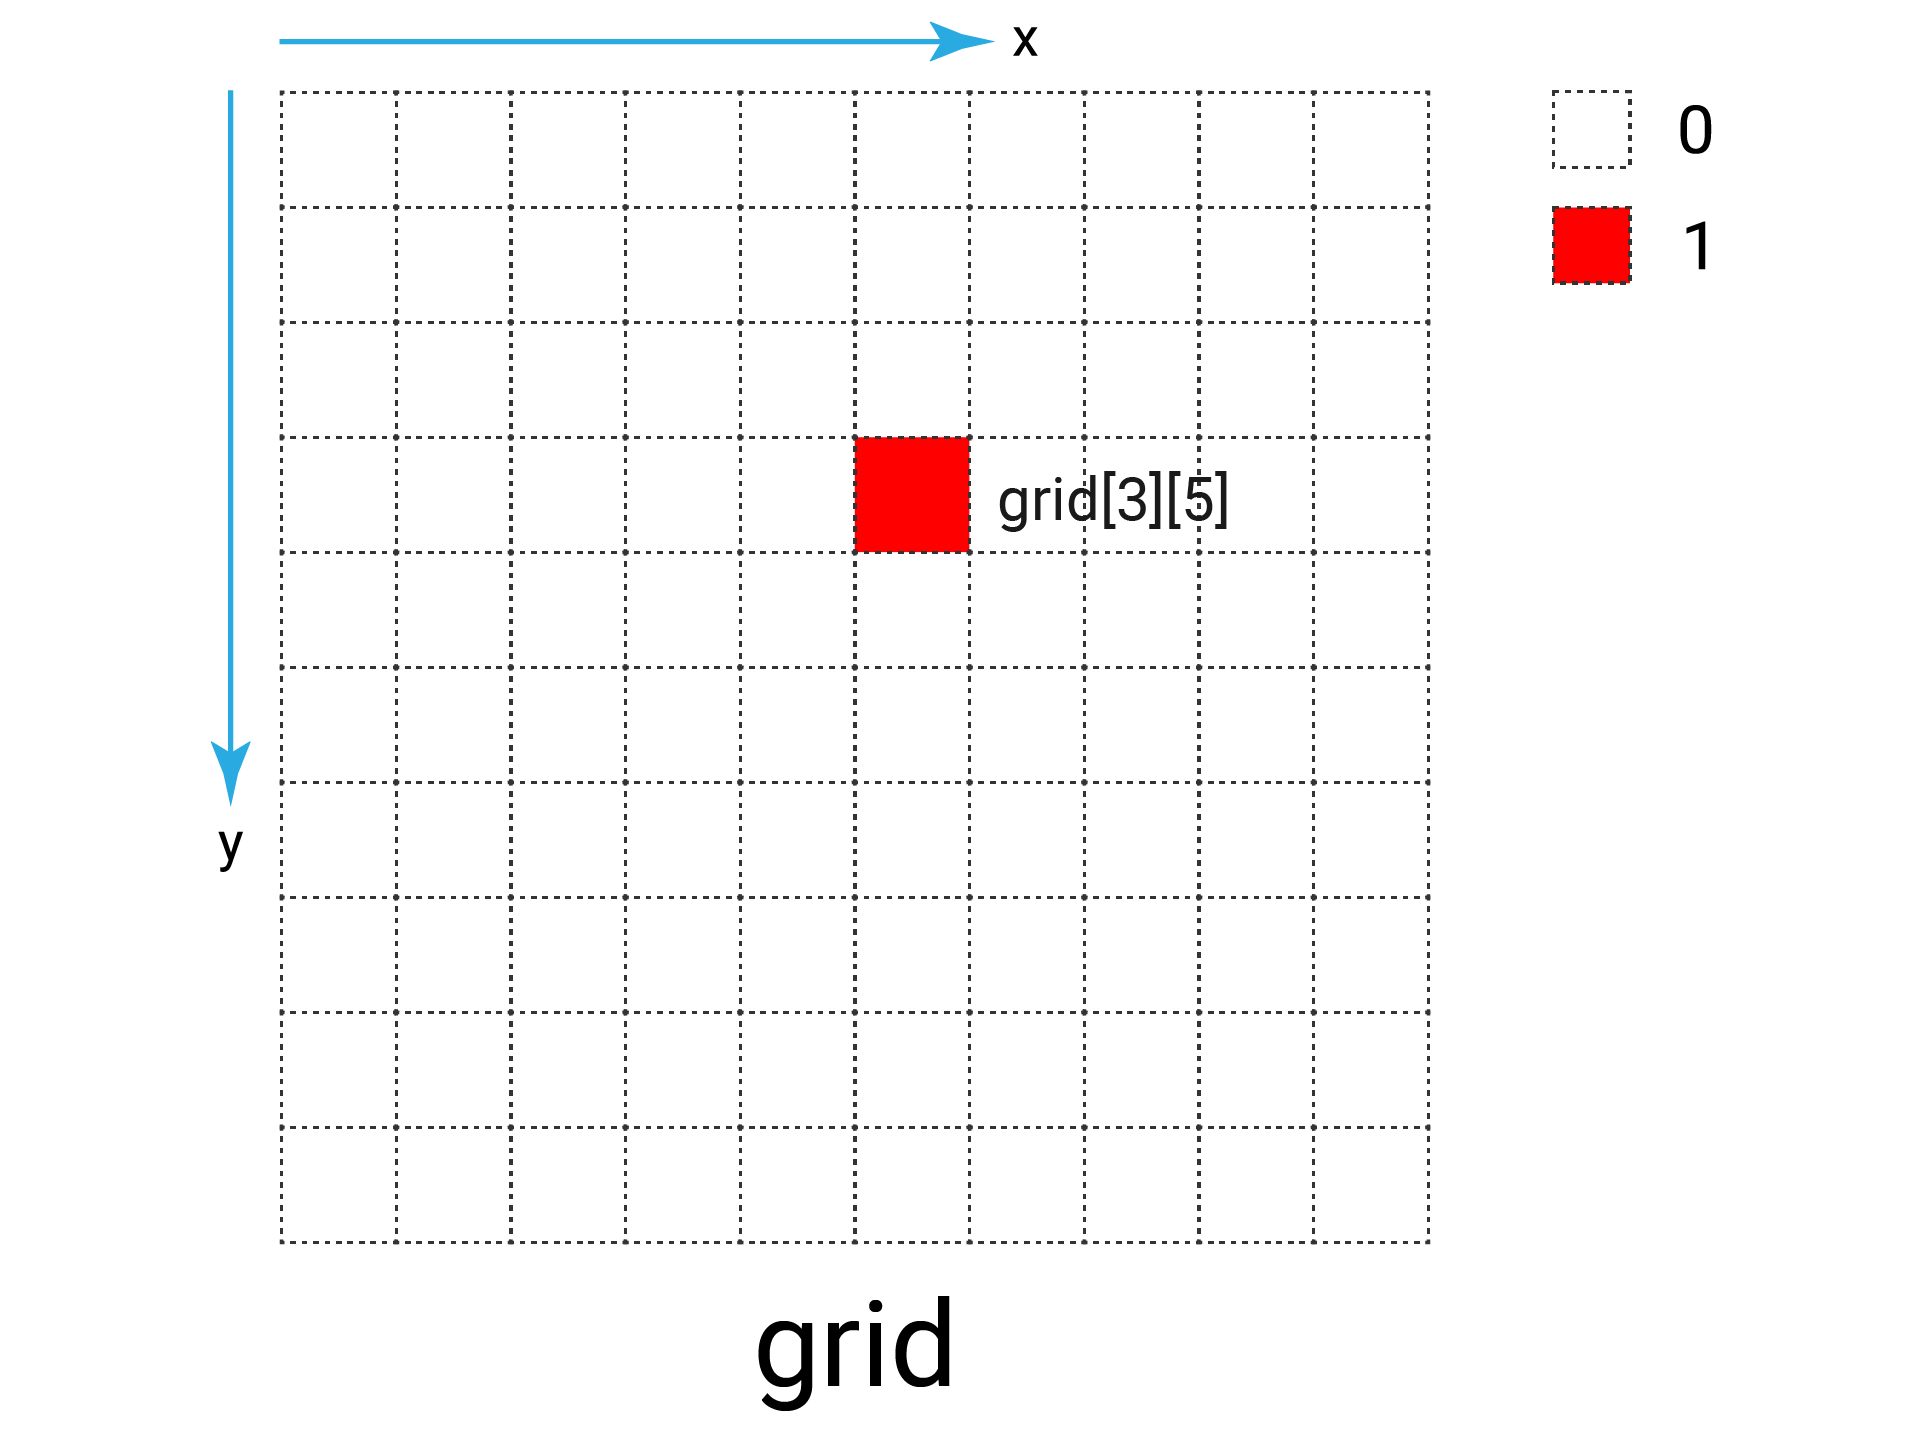
Picture this: the screen is like a giant canvas, divided into a grid where each square represents a single particle of sand. As the sand moves, it jumps from one square to another. To keep track of these squares, I’ve organized them into a 2D array of rows and columns. A specific square is referred to as grid[rowIndex][columnIndex].
Each square in the array is labeled as either having sand (1) or being empty (0). At the start, it's all 0 because, well, there is no sand yet. So, I randomly picked a square and switched its status to 1. Then, I drew a red square on that spot to mark the initial sand particle.
2. Move it
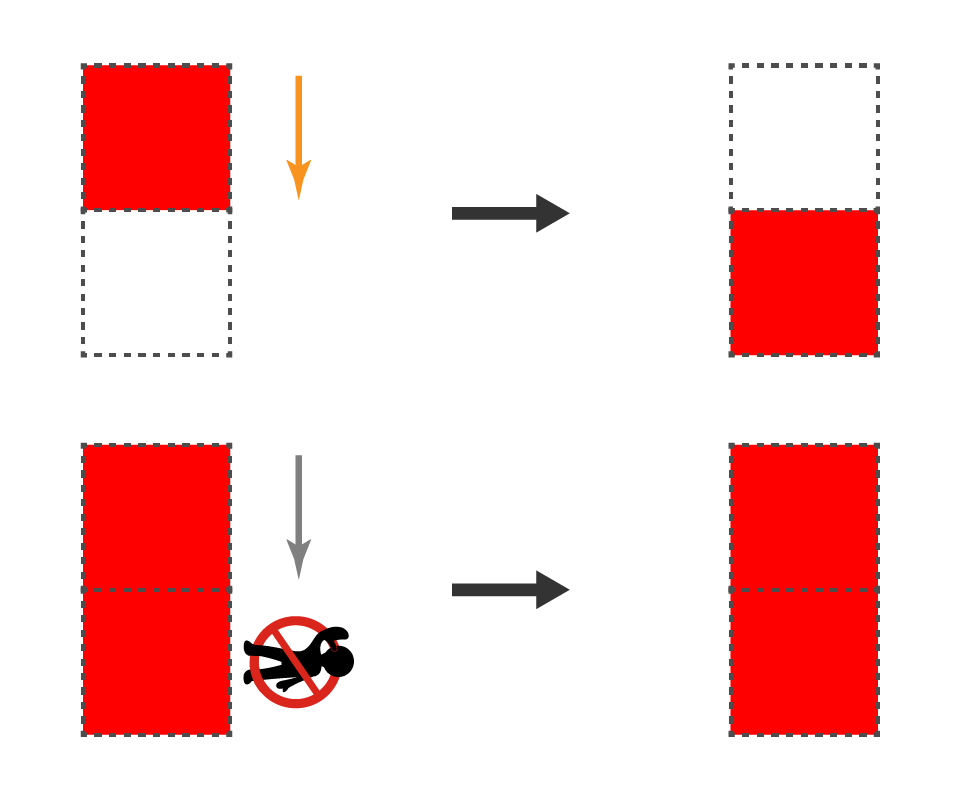
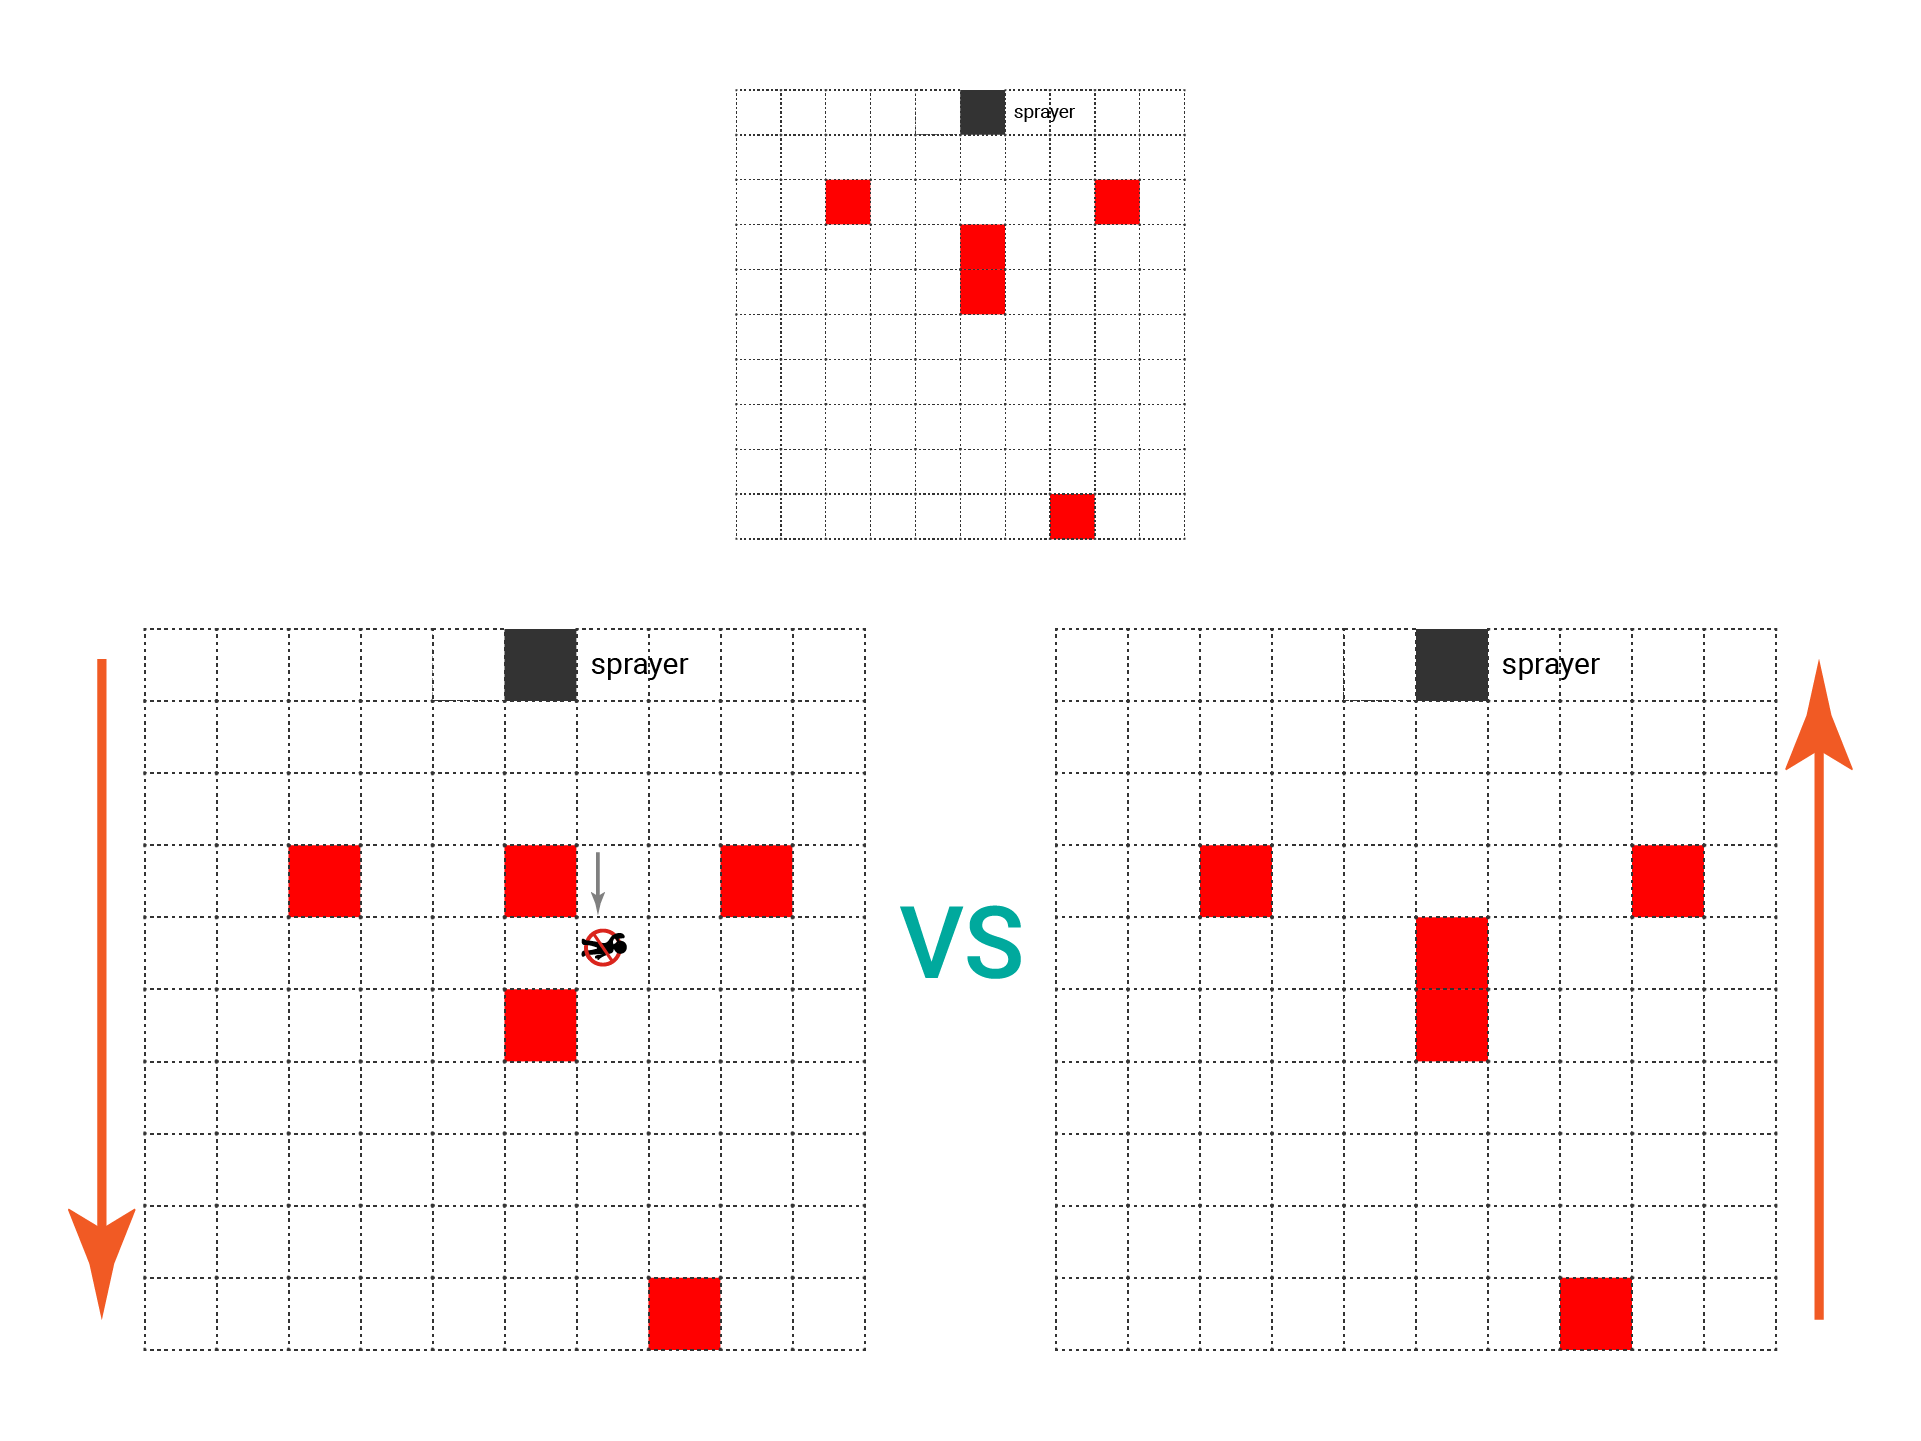
To move a sand particle downward, I just need to draw it on the square below and clear its current position. But, what if the square below isn't empty? It gets blocked and stays put.
The trick is to check the states of all squares. If a square isn't empty, I looked below to determine if the sand can move or not.
Ah, the first problem emerged! While iterating and updating grid states, an error popped up. Drawing from experience, I suspected it might be an array out-of-index issue. And indeed, that's the case.
When iterating through the cells in the last row to determine movement, each one needs to reference the one below it. But alas, there are no cells below the last row! Additionally, no need to check that row, as it's already at the bottom🤨. The solution? Simply skip the last row during iteration.
3. Add sand sprayer
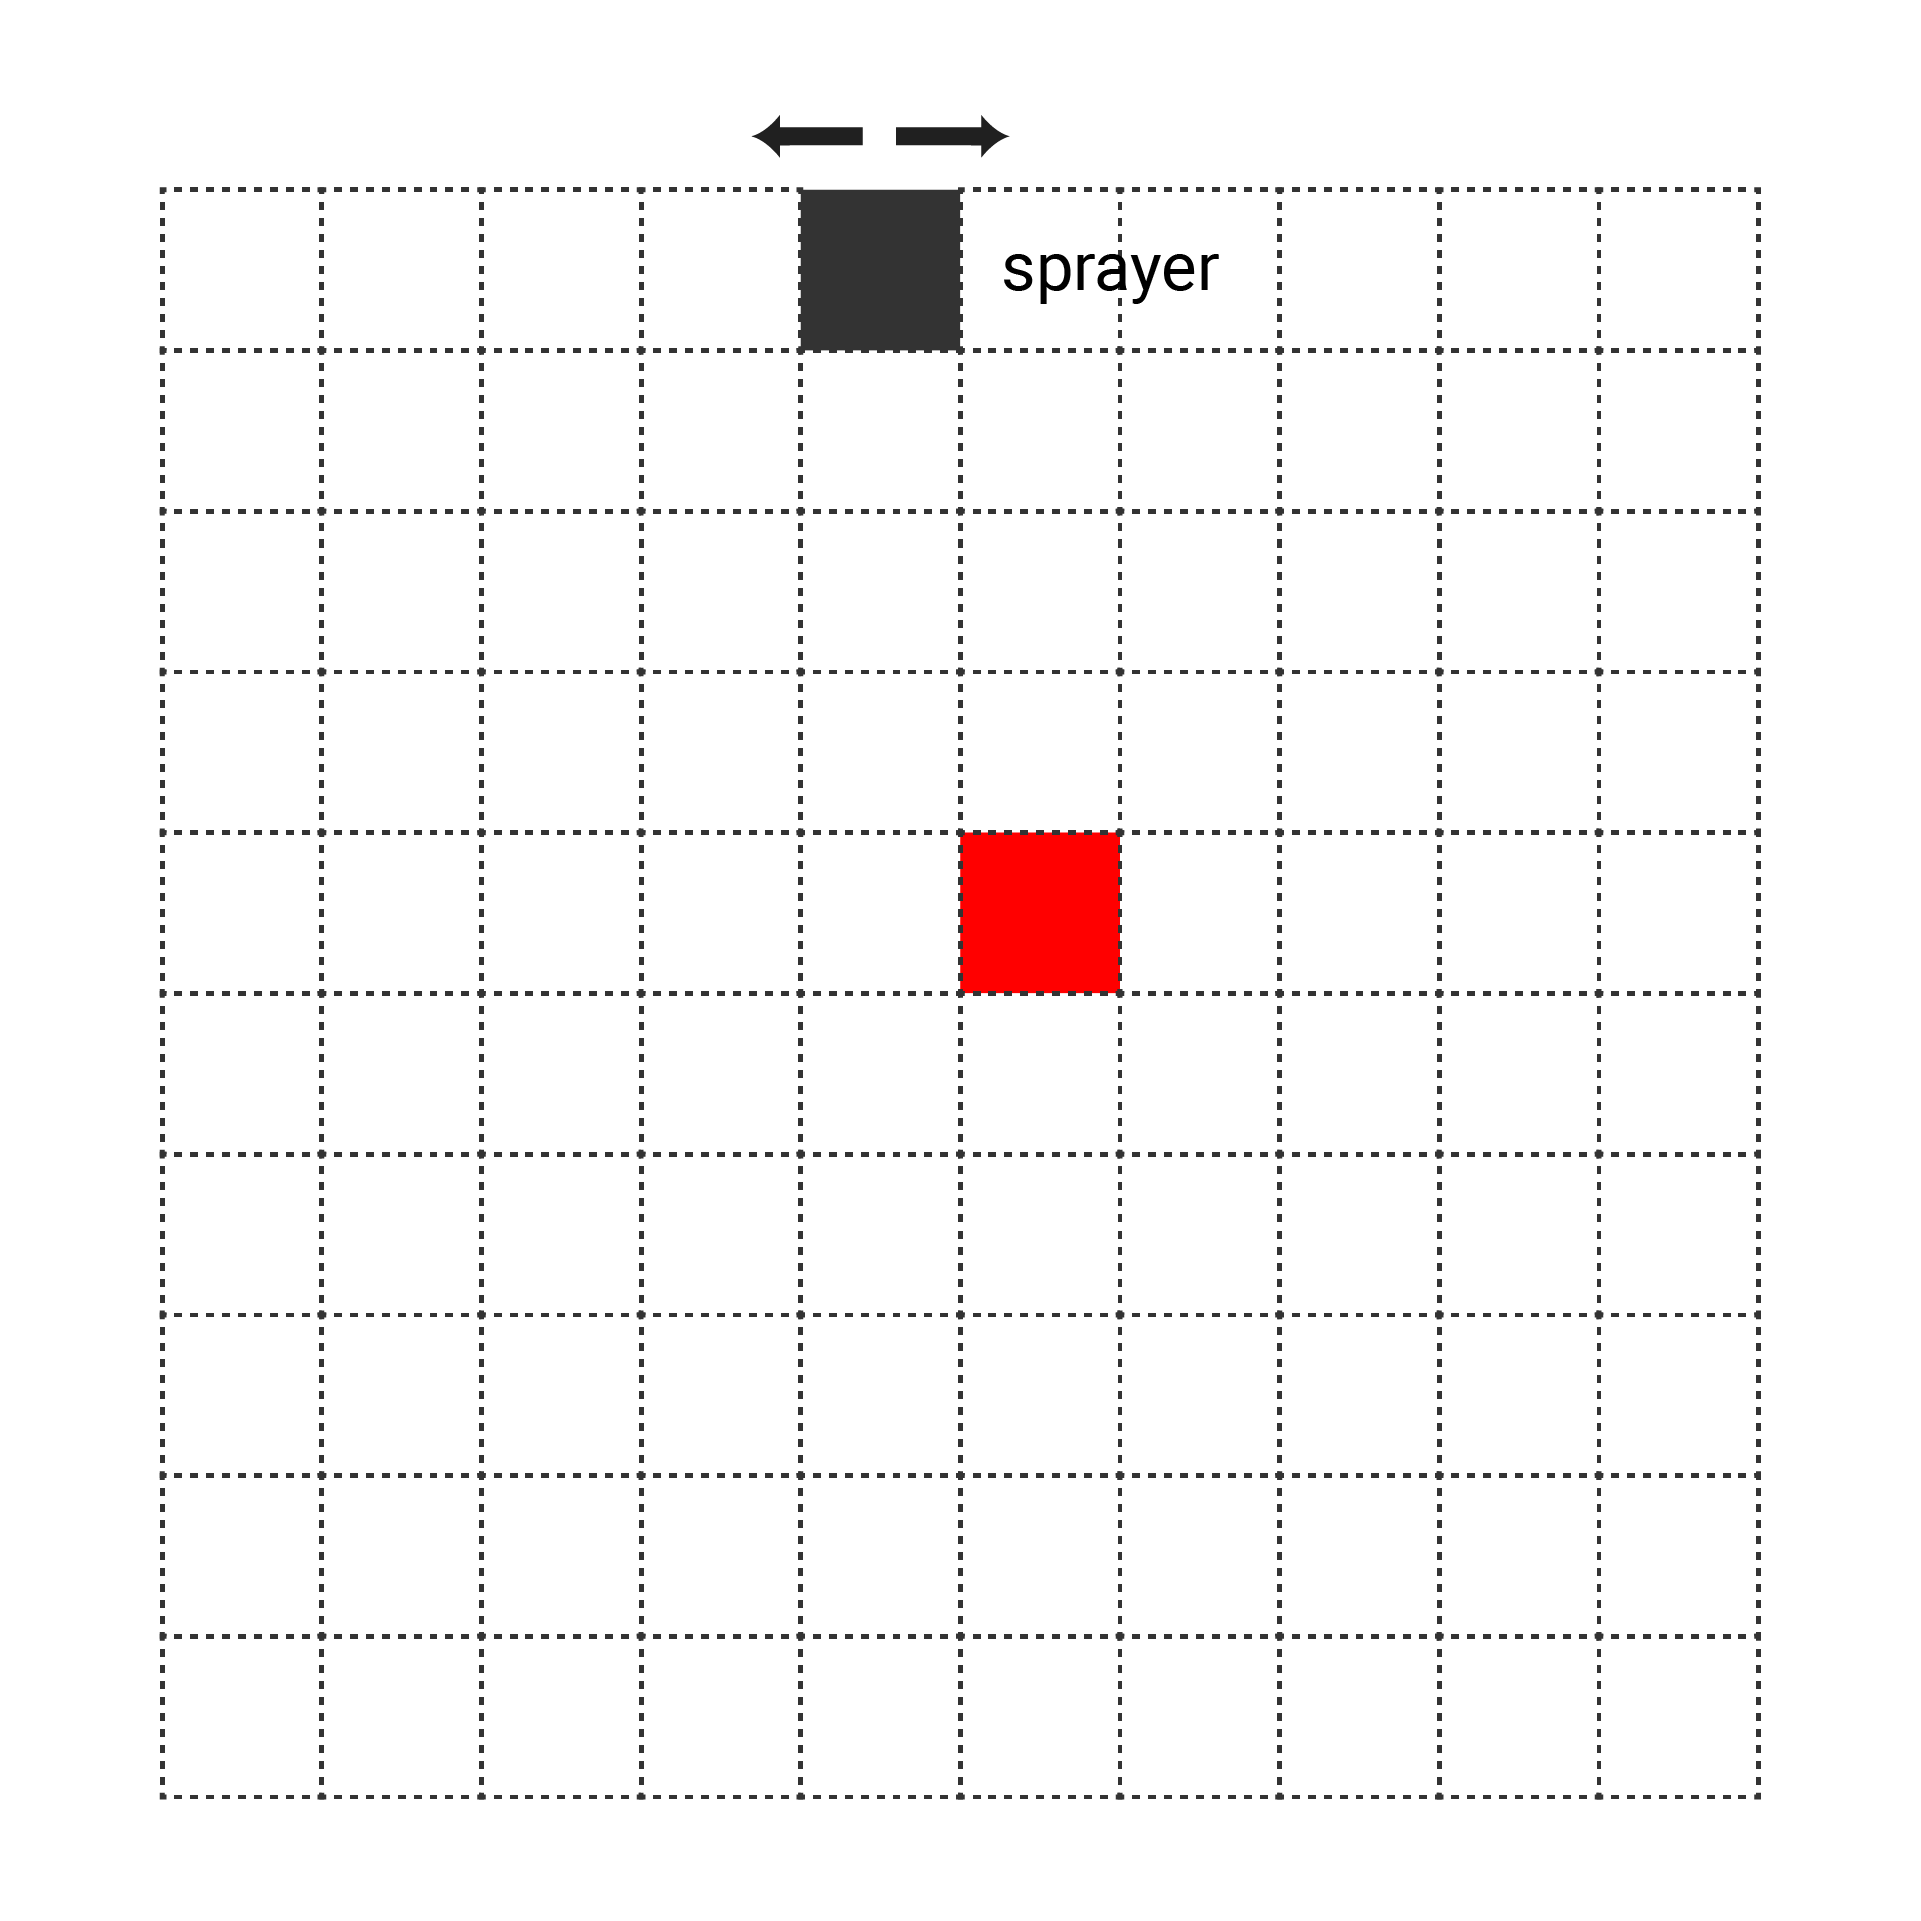
Let's take a break from the sand and shift our attention to the sprayer. Positioned at the top of the screen, it's set to smoothly slide left or right in response to my potentiometer twist.
To make this happen, I created a square matching the size of all other squares. This way, the first row of the grid is solely dedicated to the sprayer's movements. The potentiometer readings are mapped to the cell index, determining the sprayer's position.
Oh, wait… sometimes the sprayer drifted back and forth 🫨.
This issue often arises when dealing with a potentiometer, as its readings can fluctuate and be mapped to different values. To avoid this, I opted to take an average reading.
4. Create sand with the sprayer
Now, let's bring the sprayer and sand together. The initial random sand particle was no longer necessary. I was ready to generate sand!
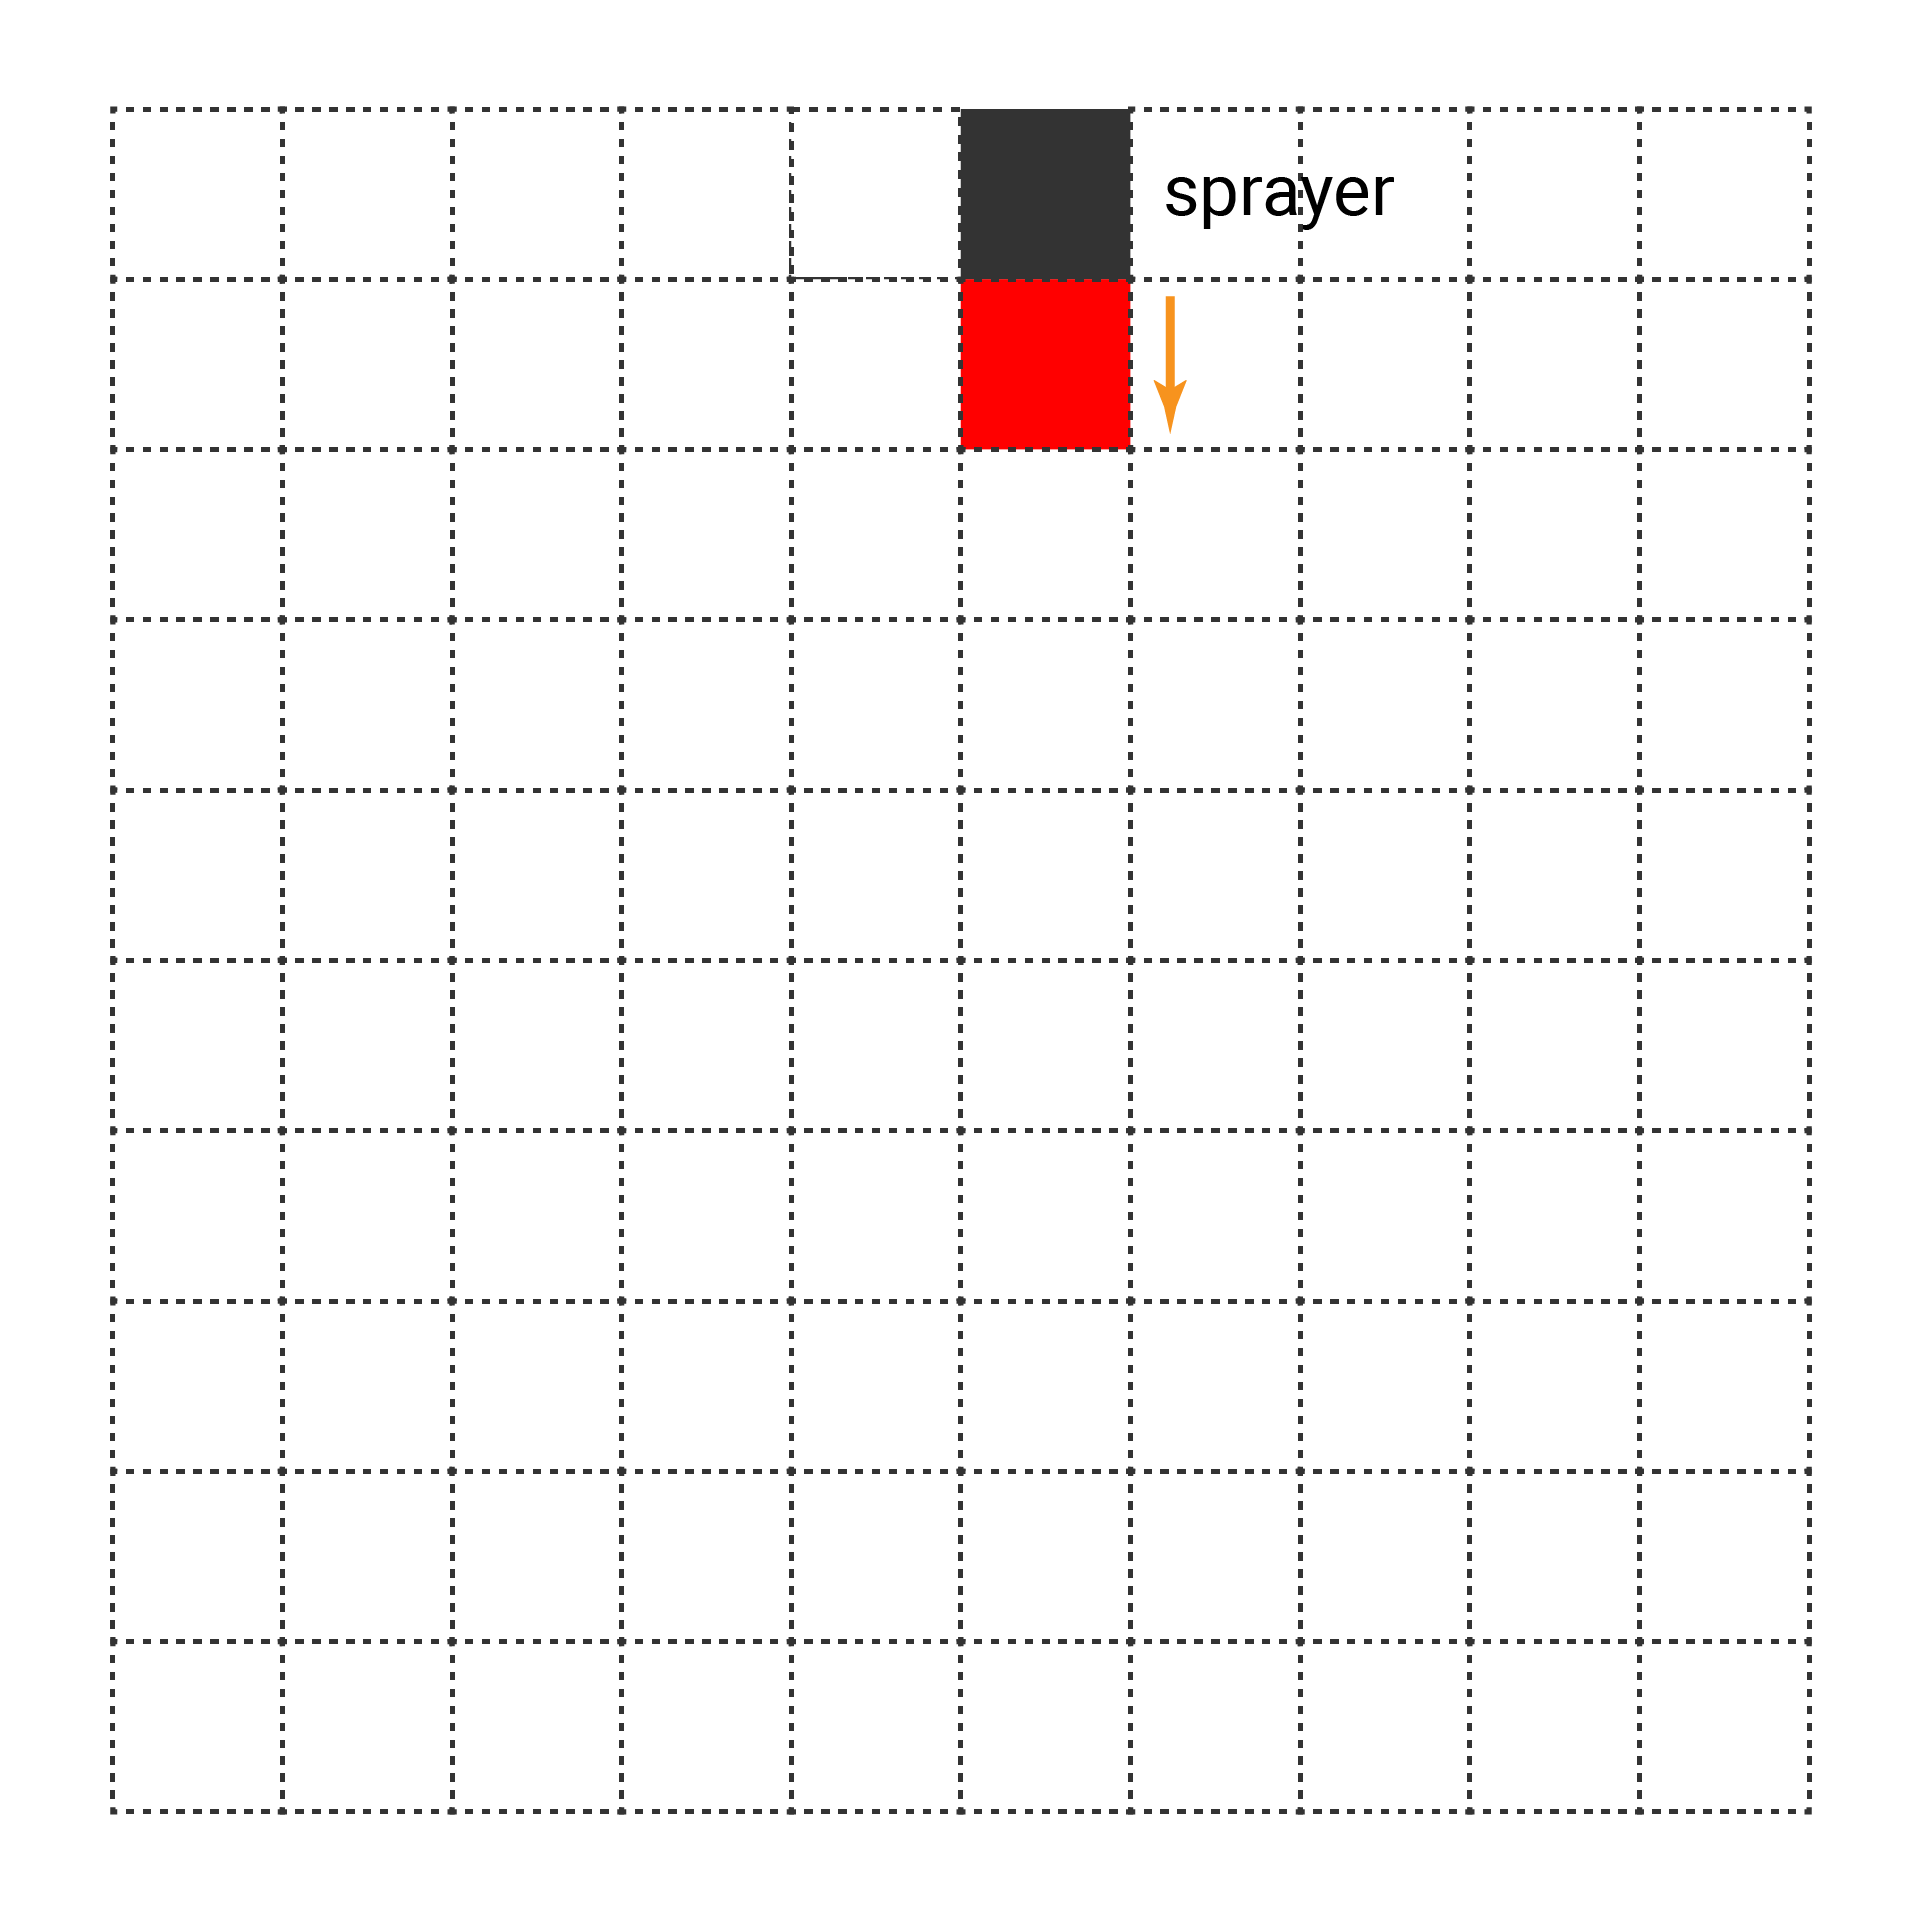
To kick things off, I needed a trigger condition for sand generation. So, I introduced a button, and when pressed, sand generation began. The new sand particles would appear below the sprayer, specifically in the second row.
However, if sand particles were created endlessly while the button is held down, it could overcrowd my tiny screen. To prevent this, I added a small gap before each new sand particle.
As the number of sand particles increased, I noticed an illogical aspect of my sand falling mechanism. If the square below the current sand was not empty, the current sand remained still, while the sand particle below it might fall when it was its turn.
To address this, I reversed the iteration of rows in my algorithm. Thus, the sand particle below would be moved downward to clear the square in advance if possible, allowing the current particle to fall successfully.
5. Create natural sandpiles
Currently, the sand particles would stop if the squares below them were filled. As a result, they piled up vertically, which appeared unnatural. In reality, sand continues to spread to the sides of the pile instead of stacking vertically.
If the square below is not empty, it's time to examine the states of the squares to the right and left of it. To prevent the sand from moving exclusively to the left or right, I introduced some randomness to determine the direction each time.
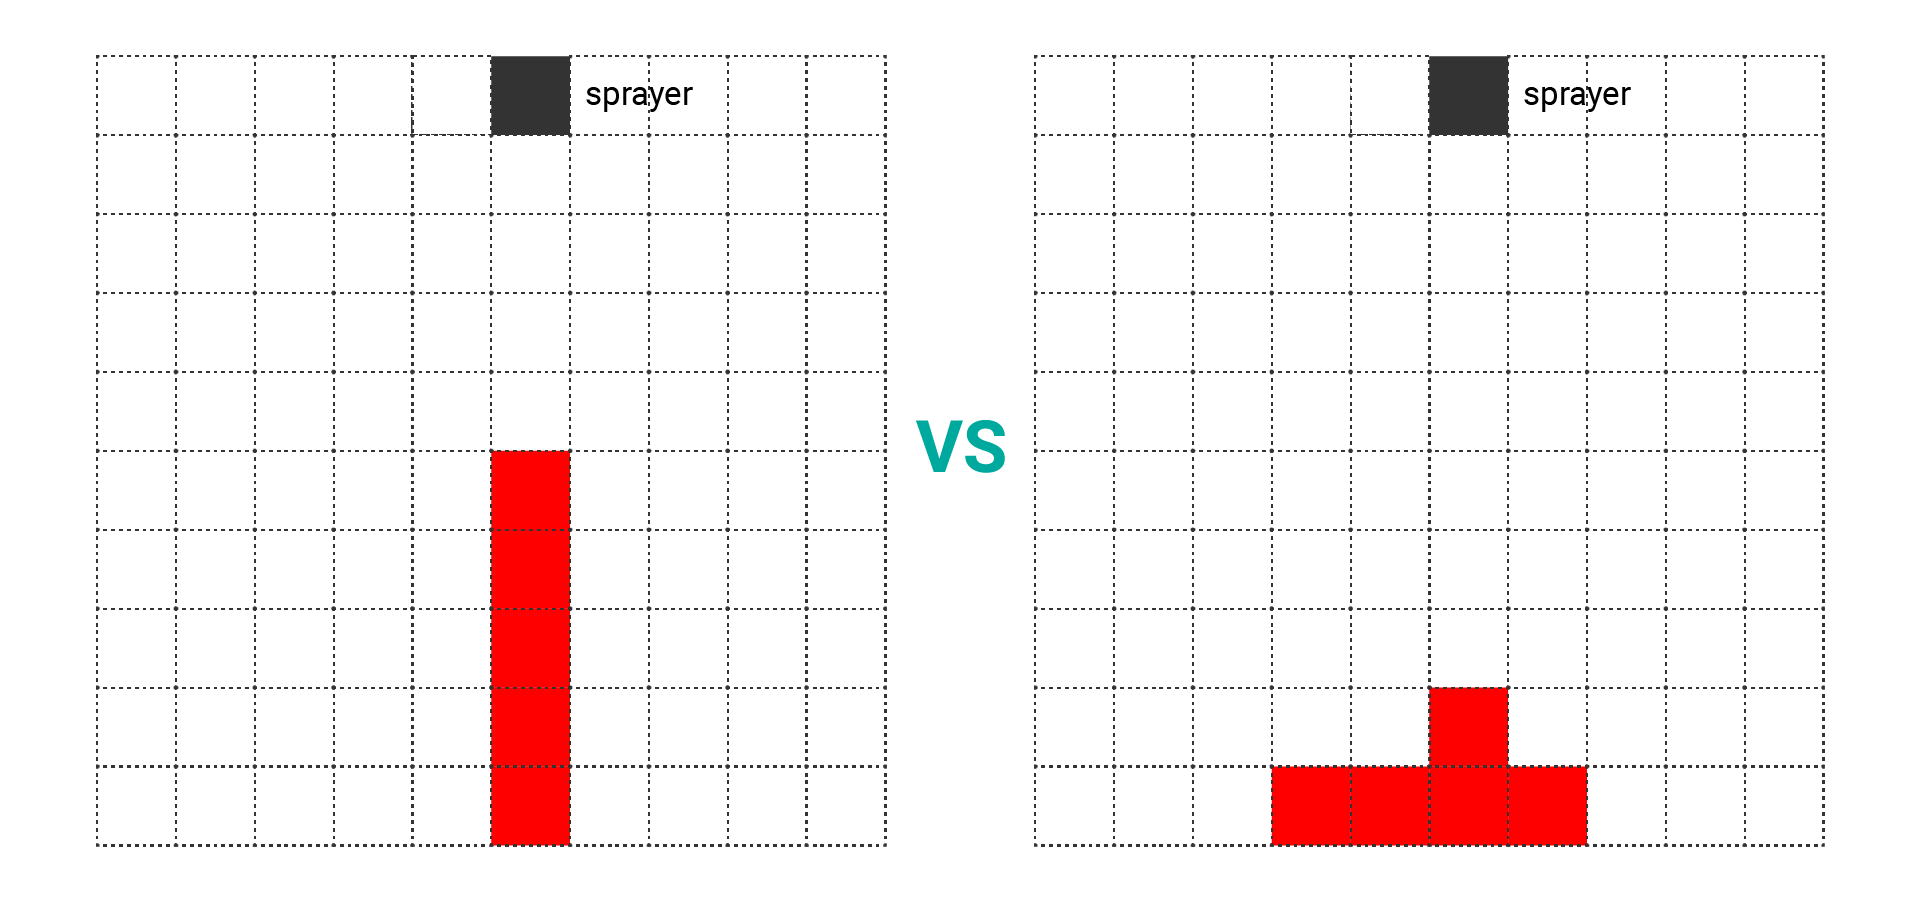
And voila! The falling sand simulation is complete.
6. Add more sand
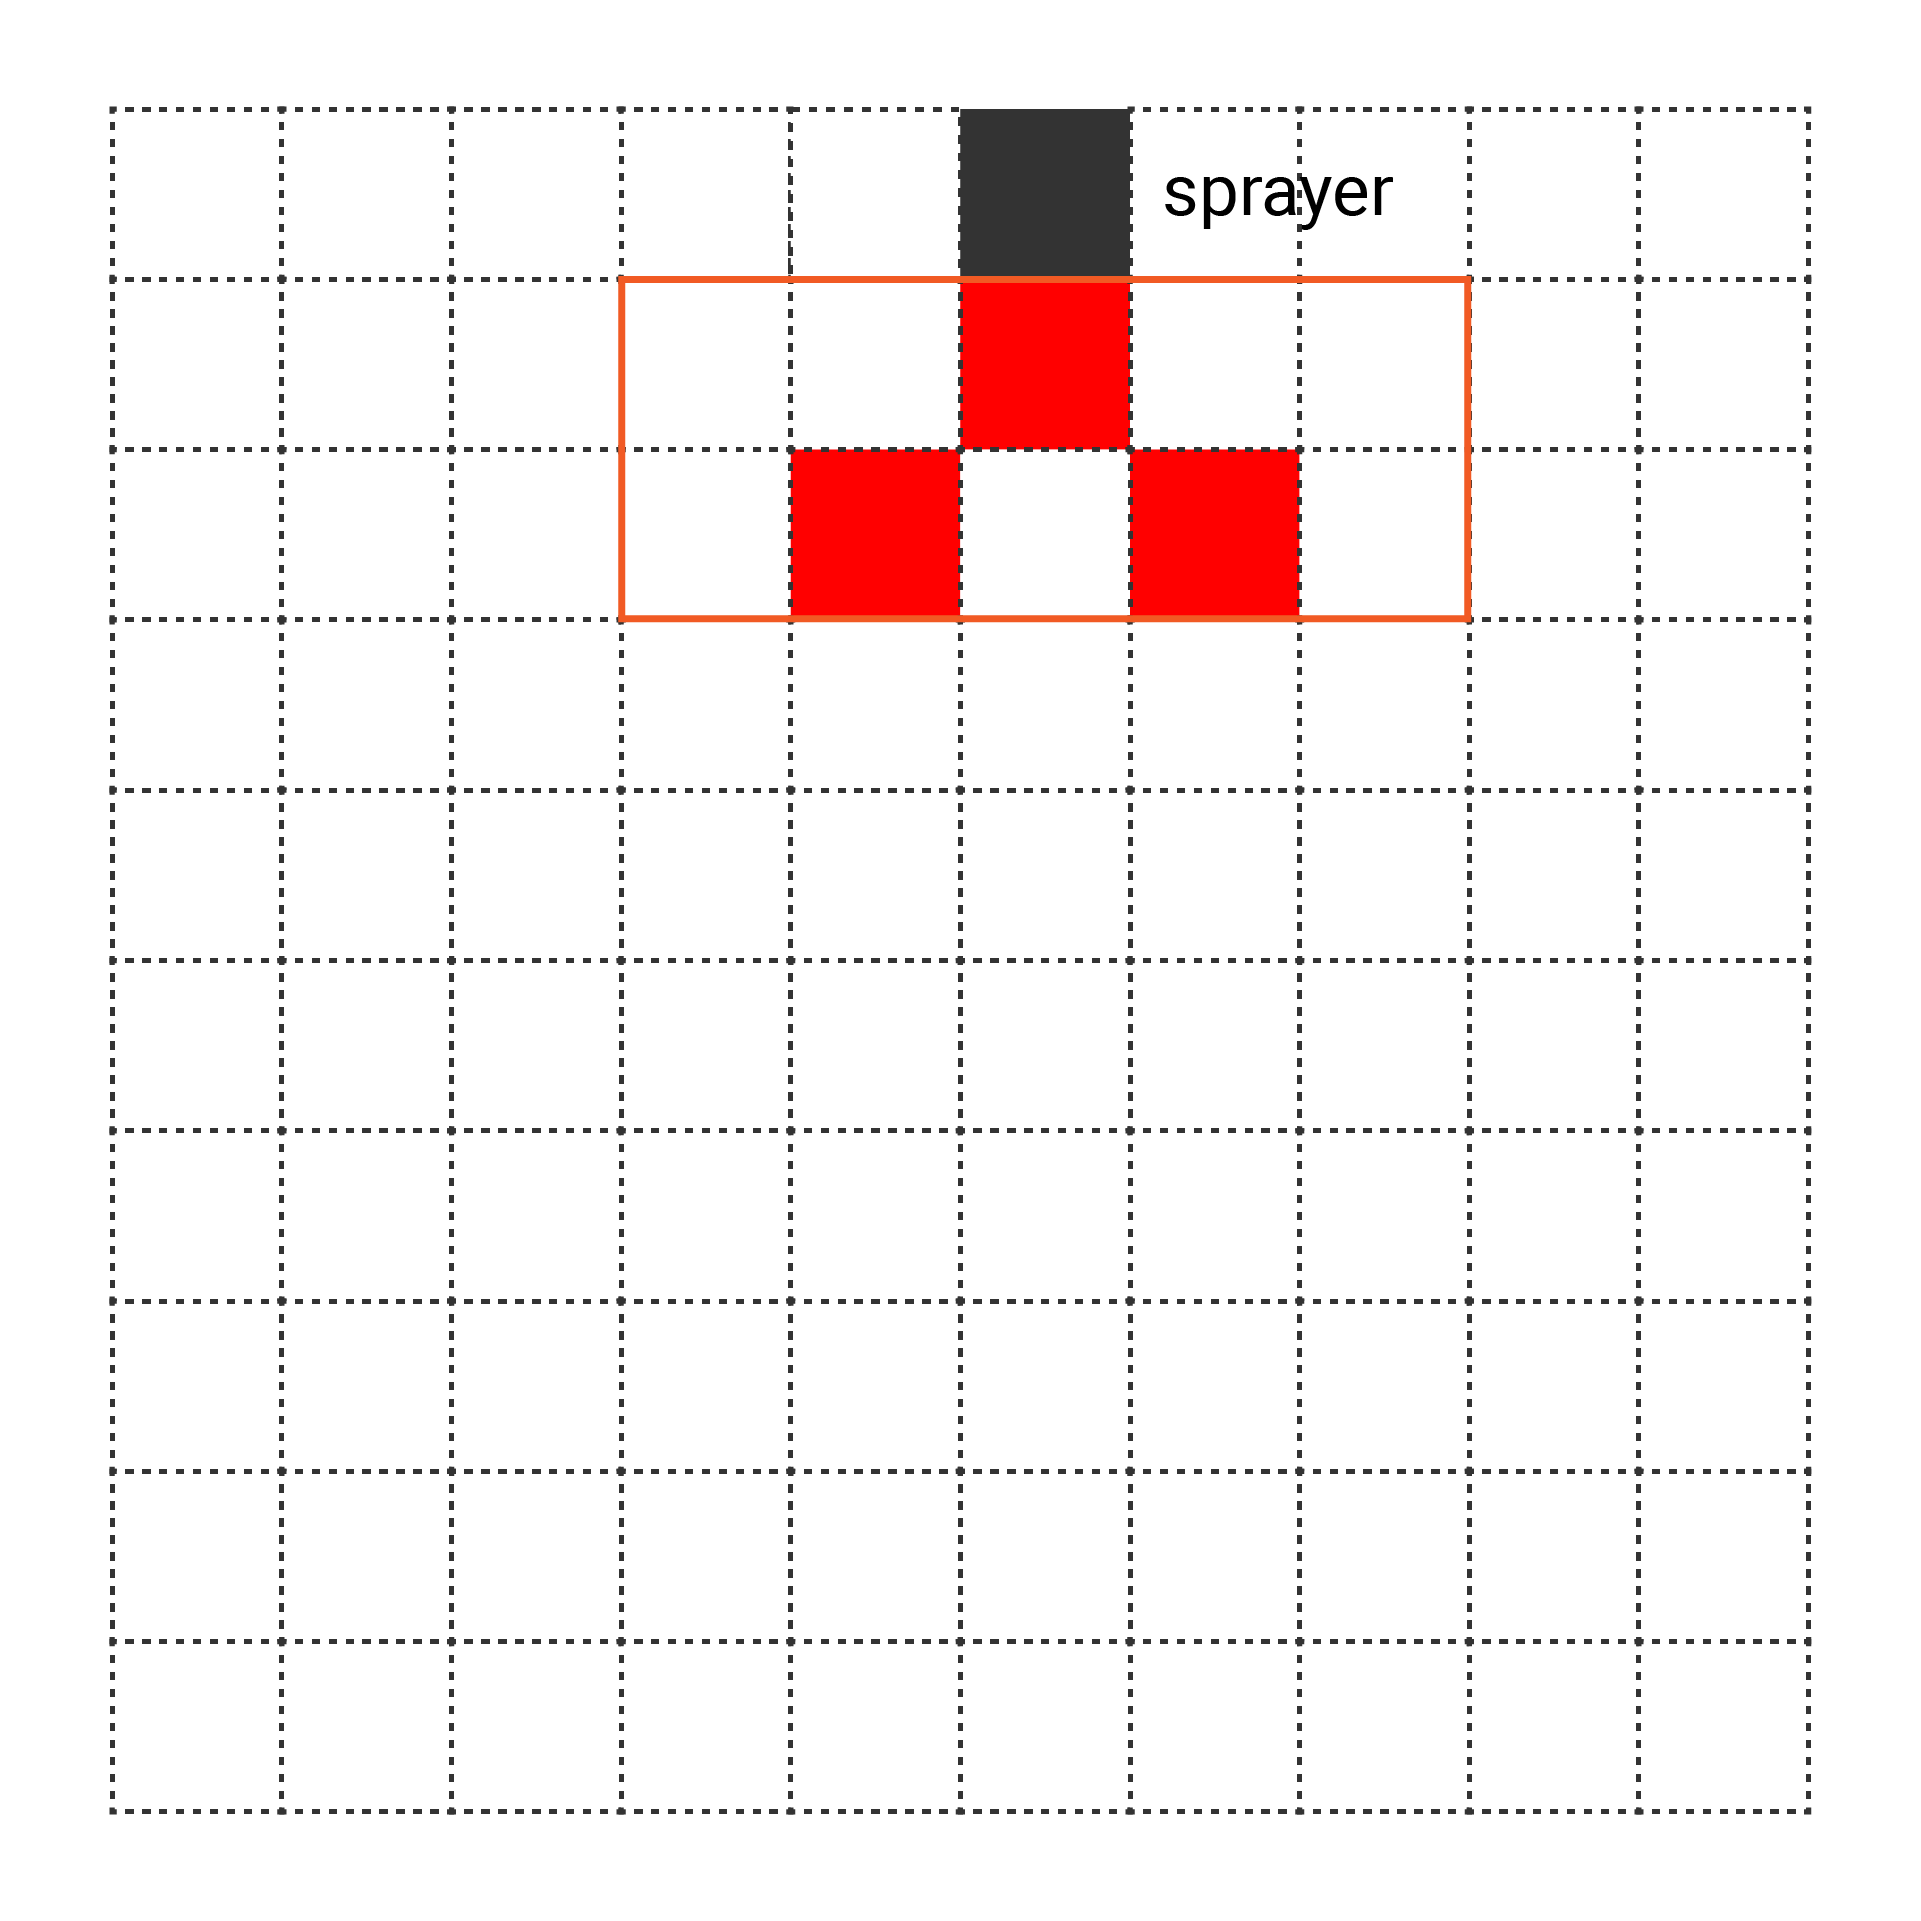
Now, it was time to elevate the visual effects.
The sprayer only added one sand particle at a time, which wasn’t particularly striking. To enhance the visual impact, I increased the number of sand particles added each time within a certain range. The squares within that range were chosen randomly.
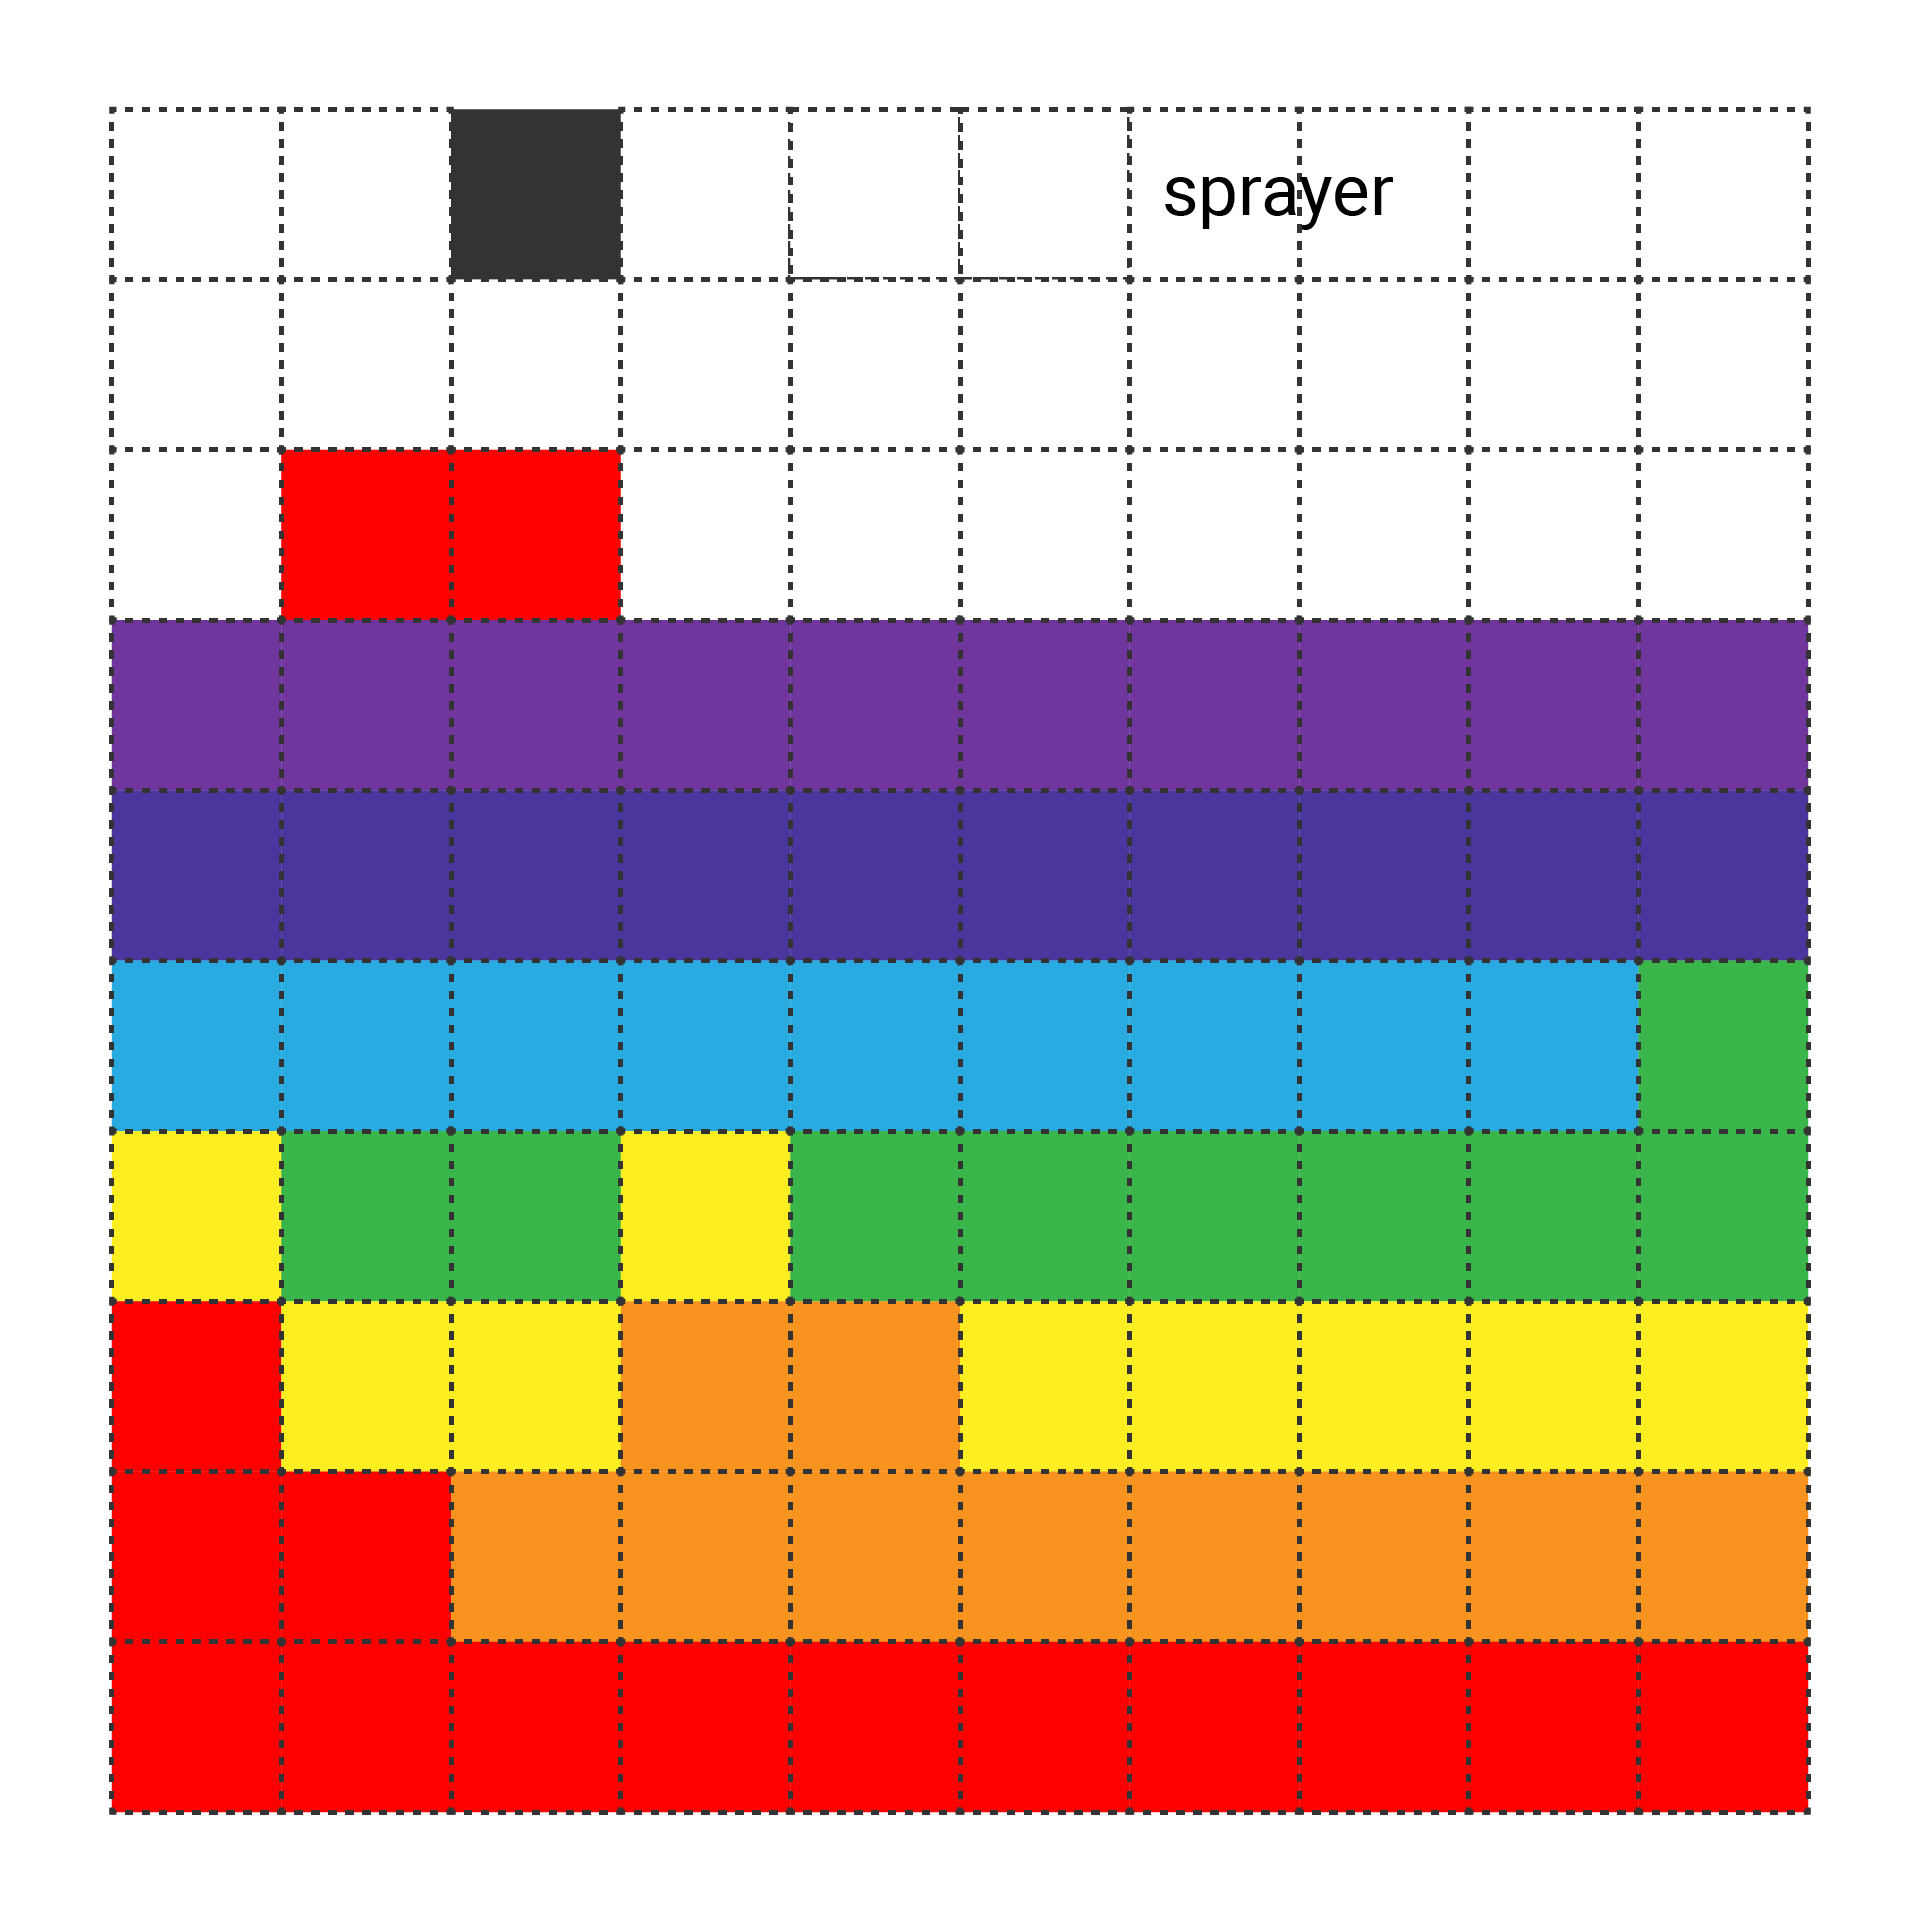
7. Add more colors
A monochrome scene can be rather dull... I’d like to inject some colors! It's quite straightforward. Instead of just using binary values of 1 and 0, update the grid state with color values. Ta-da!
Code
Well, folks, there you have it. Below is my code.
You can find it on GitHub. Feel free to download and give it a try. Happy coding!
- main.swift
- Sand.swift
import SwiftIO
import MadBoard
import ST7789


// Initialize the SPI pin and the digital pins for the LCD.
let bl = DigitalOut(Id.D2)
let rst = DigitalOut(Id.D12)
let dc = DigitalOut(Id.D13)
let cs = DigitalOut(Id.D5)
let spi = SPI(Id.SPI0, speed: 30_000_000)

// Initialize the LCD using the pins above. Rotate the screen to keep the original at the upper left.
let screen = ST7789(spi: spi, cs: cs, dc: dc, rst: rst, bl: bl, rotation: .angle90)

let cursor = AnalogIn(Id.A0)
let button = DigitalIn(Id.D1)
var pressCount = 0

var sand = Sand(screen: screen, cursor: cursor)

while true {
    // Add more sand particles if the button is been pressed.
    if pressCount > 10 {
        sand.drawNewSand()
        pressCount = 0
    }

    if button.read() {
        pressCount += 1
    } else {
        pressCount = 0
    }

    sleep(ms: 5)

    // Update the position of sand and cursor over time.
    sand.update(cursor: cursor)
}
import SwiftIO
import ST7789
typealias Point = (x: Int, y: Int)

struct Sand {
    let screen: ST7789
    // Keep the size greater than 1.
    let sandSize: Int = 4
    let row: Int
    let column: Int

    // The entire screen is made up of grids.
    // When a new sand particle appears, its color fills the corresponding grid.
    // This array stores the color value for each grid.
    var gridColors: [[UInt16]]

    // The x coordinate of the cursor used to add new sand.
    var cursorPos = 0
    var lastCursorPos = 0

    // Store the index to get current color value from the `colors` array.
    var colorIndex = 0
    let colors = Colors.colors565

    // Duration in milliseconds.
    let colorChangeDuration = 10000

    // Timestamp used to update display.
    var lastColorChangeTime: Int64 = 0

    // Initialize the screen with all grids defaulting to black and display the cursor.
    init(screen: ST7789, cursor: AnalogIn) {
        self.screen = screen

        row = screen.height / sandSize
        column = screen.width / sandSize

        // Initially, as there's no sand, all grids are set to black.
        gridColors = [[UInt16]](repeating: [UInt16](repeating: 0, count: column), count: row)

        // Read the potentiometer value and draw the cursor accordingly in the corresponding position.
        let cursorPos = getCursorPos(cursor: cursor)
        screen.drawEmptyRect(at: (cursorPos * sandSize, 0), width: sandSize, height: sandSize, stroke: 1, color: 0xFFFF)

        lastCursorPos = cursorPos
        lastColorChangeTime = getSystemUptimeInMilliseconds()
    }

    // Update the position of the cursor and sand particles over time.
    mutating func update(cursor: AnalogIn) {
        updateCursor(cursor: cursor)

        // Update the color for newly added sand particles.
        let current = getSystemUptimeInMilliseconds()
        if current - lastColorChangeTime >= colorChangeDuration {
            colorIndex += 1
            if colorIndex == colors.count {
                colorIndex = 0
            }
            lastColorChangeTime = current
        }

        updateSand()
    }

    // Update the cursor's position as you rotate the potentiometer.
    mutating func updateCursor(cursor: AnalogIn) {
        cursorPos = getCursorPos(cursor: cursor)

        if cursorPos != lastCursorPos {
            screen.drawRect(at: (lastCursorPos * sandSize, 0), width: sandSize, height: sandSize, color: 0)
            screen.drawEmptyRect(at: (cursorPos * sandSize, 0), width: sandSize, height: sandSize, stroke: 1, color: 0xFFFF)
            lastCursorPos = cursorPos
        }
    }

    // Calculate the cursor's position based on the potentiometer's reading.
    func getCursorPos(cursor: AnalogIn) -> Int {
        var values: Float = 0

        for _ in 0..<10 {
            values += cursor.readPercentage()
        }

        var x = values * Float(column - 1) / 10
        x.round(.toNearestOrAwayFromZero)
        return Int(x)
    }

    // Move the sand particles down.
    mutating func updateSand() {
        for y in (0..<gridColors.count-1).reversed() {
            for x in gridColors[y].indices {
                let color = gridColors[y][x]
                if color > 0 {
                    // If the grid below the particle is black, fill this grid with the sand color.
                    if gridColors[y+1][x] == 0 {
                        gridColors[y+1][x] = color
                        gridColors[y][x] = 0

                        screen.drawRect(at: (x * sandSize, y * sandSize), width: sandSize, height: sandSize, color: 0)
                        screen.drawRect(at: (x * sandSize, (y + 1) * sandSize), width: sandSize, height: sandSize, color: color)
                    } else {
                        // If the grid below is unavailable, the particle moves randomly to the left or right.
                        let left = Bool.random()
                        if left && x > 0 && gridColors[y+1][x-1] == 0 {
                            gridColors[y+1][x-1] = color
                            gridColors[y][x] = 0

                            screen.drawRect(at: (x * sandSize, y * sandSize), width: sandSize, height: sandSize, color: 0)
                            screen.drawRect(at: ((x - 1) * sandSize, (y + 1) * sandSize), width: sandSize, height: sandSize, color: color)
                        } else if !left && x < gridColors[y].count - 1 && gridColors[y+1][x+1] == 0 {
                            gridColors[y+1][x+1] = color
                            gridColors[y][x] = 0

                            screen.drawRect(at: (x * sandSize, y * sandSize), width: sandSize, height: sandSize, color: 0)
                            screen.drawRect(at: ((x + 1) * sandSize, (y + 1) * sandSize), width: sandSize, height: sandSize, color: color)
                        }
                    }
                }
            }
        }
    }

    // Randomly add new sand particles below the cursor, then update the colors of the corresponding grids.
    mutating func drawNewSand() {
        // Define the area of the new particles.
        let extent = 4

        for y in 1...extent {
            for x in -extent/2...extent/2 {
                if Bool.random() {
                    let newSandPos: Point = (cursorPos + x, y)
                    if newSandPos.x < column && newSandPos.x >= 0 {
                        gridColors[newSandPos.y][newSandPos.x] = colors[colorIndex]
                        screen.drawRect(
                            at: (newSandPos.x * sandSize, newSandPos.y * sandSize),
                            width: sandSize,
                            height: sandSize,
                            color: colors[colorIndex]
                        )
                    }
                }
            }
        }
    }
}


struct Colors {
    static let red: UInt32 = 0xFF0000
    static let orange: UInt32 = 0xFF7F00
    static let yellow: UInt32 = 0xFFFF00
    static let green: UInt32 = 0x00FF00
    static let blue: UInt32 = 0x0000FF
    static let indigo: UInt32 = 0x4B0082
    static let violet: UInt32 = 0x9400D3
    static let colors888 = [red, orange, yellow, green, blue, indigo, violet]
    // Get 16bit color data.
    static let colors565: [UInt16] = colors888.map { getRGB565BE($0) }

    // The screen needs RGB565 color data, so change color data from UInt32 to UInt16.
    // Besides, the board uses little endian format, so the bytes are swapped.
    static func getRGB565BE(_ color: UInt32) -> UInt16 {
        return UInt16(((color & 0xF80000) >> 8) | ((color & 0xFC00) >> 5) | ((color & 0xF8) >> 3)).byteSwapped
    }
}

extension ST7789 {
    func drawRect(at point: Point, width: Int, height: Int, color: UInt16) {
        var buffer = [UInt16](repeating:color, count: width * height)
        for py in 0..<height {
            for px in 0..<width {
                buffer[py * width + px] = color
            }
        }

        screen.writeBitmap(x: point.x, y: point.y, width: width, height: height, data: buffer)
    }

    func drawEmptyRect(at point: Point, width: Int, height: Int, stroke: Int, color: UInt16) {
        for w in 0..<width {
            for line in 0..<stroke {
                writePixel(x: point.x + w, y: point.y + line, color: color)
                writePixel(x: point.x + w, y: point.y + height - stroke + line, color: color)
            }
        }

        for h in stroke..<height-stroke {
            for line in 0..<stroke {
                writePixel(x: point.x + line, y: point.y + h, color: color)
                writePixel(x: point.x + width - stroke + line, y: point.y + h, color: color)
            }
        }
    }
}